Nutritional Information
Per serving (approximate values):
- Calories: 320 kcal
- Protein: 4g
- Carbohydrates: 48g
- Fat: 14g
- Fiber: 3g
- Sodium: 210mg
Ingredients
- 2 cups all-purpose flour
- 1 teaspoon baking soda
- 1/2 teaspoon salt
- 1 teaspoon ground cinnamon (optional, but recommended)
- 1/2 cup (1 stick) unsalted butter, softened
- 3/4 cup granulated sugar
- 1 large egg, room temperature
- 1 teaspoon vanilla extract
- 3 very ripe medium bananas, mashed (about 1 cup)
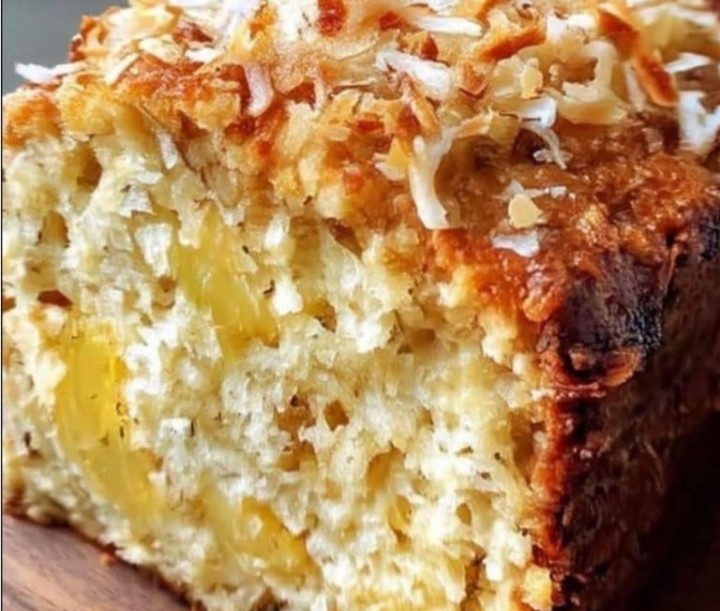
- 1/2 cup unsweetened shredded coconut, plus 2 tablespoons for topping
- 1/2 cup crushed pineapple, well-drained (from a 8-ounce can)
Instructions
- Preheat your oven to 350°F (175°C). Grease and flour a 9×5-inch loaf pan, or line it with parchment paper, leaving an overhang on the long sides for easy removal.
- In a medium bowl, whisk together the all-purpose flour, baking soda, salt, and ground cinnamon (if using). Set aside.
- In a large mixing bowl, using an electric mixer, cream together the softened unsalted butter and granulated sugar until light and fluffy, about 2-3 minutes.
- Beat in the large egg until well combined, then stir in the vanilla extract.
- Add the mashed bananas to the wet ingredients and mix until just combined. Don’t overmix.
- Gradually add the dry ingredients to the wet ingredients, mixing on low speed until just combined. Be careful not to overmix the batter; a few lumps are okay. Overmixing can lead to a tough bread.
- Gently fold in the 1/2 cup of shredded coconut and the well-drained crushed pineapple using a spatula. Mix until evenly distributed throughout the batter.
- Pour the batter into the prepared loaf pan, spreading it evenly. Sprinkle the remaining 2 tablespoons of shredded coconut over the top of the batter.
- Bake for 55-65 minutes, or until a wooden skewer or toothpick inserted into the center of the loaf comes out clean. If the top starts to brown too quickly, you can loosely tent the loaf with aluminum foil for the last 15-20 minutes of baking.
- Once baked, remove the loaf pan from the oven and let the banana bread cool in the pan for 10-15 minutes. This allows it to firm up and prevents it from crumbling when removed.
- After cooling in the pan, carefully lift the banana bread out using the parchment paper overhang or invert it onto a wire rack to cool completely before slicing and serving.
Cooking Tips and Variations
For the absolute best Hawaiian Banana Bread, the ripeness of your bananas is key. Don’t be afraid to use bananas that are very brown and spotty; these are packed with natural sweetness and moisture, which translates directly into a more flavorful and tender loaf. If your bananas aren’t quite ripe enough, you can speed up the process by baking them in their peels on a baking sheet at 300°F (150°C) for 15-30 minutes, or until they turn black and soft. Allow them to cool before mashing.
Toasting the coconut really enhances its flavor. While the recipe calls for sprinkling untoasted coconut on top, you can toast the 1/2 cup of coconut for the batter as well. Simply spread it on a baking sheet and bake at 300°F (150°C) for 5-10 minutes, stirring occasionally, until golden brown. Watch it closely as it can burn quickly! This adds a deeper, nuttier dimension to the bread. When using canned pineapple, draining it thoroughly is crucial. Excess moisture can make your banana bread soggy and prevent it from baking properly. Press out as much liquid as you can before adding it to the batter.
For variations, consider adding 1/2 cup of chopped macadamia nuts along with the coconut and pineapple for an extra crunch and a truly authentic Hawaiian touch. If you’re a chocolate lover, white chocolate chips pair wonderfully with the tropical flavors. You could also swirl in a spoonful of cream cheese frosting after baking for an extra decadent treat. For a slightly healthier twist, you can substitute half of the granulated sugar with brown sugar for a deeper, molasses-like flavor, or swap out some of the all-purpose flour for whole wheat pastry flour. You can also experiment with a hint of freshly grated ginger for a subtle zing that complements the pineapple beautifully.
Don’t overmix the batter! This is a common mistake in quick bread recipes. Once you add the dry ingredients to the wet, mix only until just combined. Overmixing develops the gluten in the flour, leading to a tough and dense loaf rather than the desired tender crumb. A few lumps in the batter are perfectly fine. If you notice the top of your banana bread browning too quickly in the oven, especially with the coconut on top, loosely tenting it with aluminum foil for the last portion of the baking time will prevent it from burning while allowing the inside to continue cooking through. Always use the toothpick test to ensure it’s fully baked – it should come out clean, with no wet batter clinging to it.
Storage and Reheating
Storing your Hawaiian Banana Bread properly is key to maintaining its delicious tropical flavors and moist texture. Once the banana bread has completely cooled to room temperature, you can store it in an airtight container or wrap it tightly in plastic wrap. It will stay fresh and moist at room temperature for up to 3-4 days. If you live in a particularly warm or humid climate, or if you want to extend its shelf life further, you can store it in the refrigerator for up to a week. Just be aware that refrigeration can sometimes alter the texture slightly, making it a bit denser.
For longer storage, Hawaiian Banana Bread freezes beautifully! Once completely cooled, wrap individual slices or the entire loaf tightly in plastic wrap, and then wrap again in aluminum foil. This double layer helps prevent freezer burn. It can be stored in the freezer for up to 2-3 months. To thaw, simply unwrap and let it come to room temperature on the counter for a few hours, or transfer it to the refrigerator overnight. You can also gently reheat individual slices in the microwave for 15-30 seconds, or in a toaster oven until warmed through, which brings back that lovely fresh-baked aroma and soft texture.
When reheating, especially from the refrigerator or freezer, consider slicing the bread first. This allows for more even heating. A quick zap in the microwave is great for immediate gratification, making it soft and warm. If you prefer a slightly crisper exterior, a toaster oven or even a regular oven at a low temperature (around 300°F/150°C) for 5-10 minutes works wonderfully. Just be careful not to overheat, as this can dry out the bread. Serve warm slices with a dollop of whipped cream, a scoop of vanilla ice cream, or a drizzle of honey or a simple coconut glaze for an extra special treat.
Frequently Asked Questions
What kind of pineapple should I use?
For this recipe, crushed pineapple is ideal because its small pieces distribute evenly throughout the batter, providing bursts of flavor without creating large, wet pockets. Make sure to drain it very well to prevent the bread from becoming soggy. If you only have fresh pineapple, you can finely dice it and then press out excess moisture before adding it to the batter.
Can I use frozen bananas for this recipe?
Absolutely! Frozen ripe bananas are perfect for banana bread. Just thaw them completely before mashing. They will release a lot of liquid as they thaw, so make sure to drain off any excess liquid before adding them to your batter to maintain the correct moisture balance in the bread.
My banana bread is dry, what went wrong?
A dry banana bread can be caused by several factors. The most common culprits are overmixing the batter, which develops too much gluten, or overbaking. Ensure you’re only mixing until the ingredients are just combined and that you’re removing the bread from the oven as soon as a toothpick comes out clean. Using under-ripe bananas can also contribute to dryness as they don’t provide as much natural moisture.
Can I make this recipe into muffins instead of a loaf?
Yes, you can easily adapt this recipe for muffins! Simply line a 12-cup muffin tin with paper liners or grease it well. Fill each muffin cup about two-thirds full with the batter. Bake at the same temperature (350°F/175°C) for a shorter amount of time, typically 20-25 minutes, or until a toothpick inserted into the center of a muffin comes out clean. The yield will be approximately 12-15 muffins.