Introduction
Get ready to elevate your party food game with a dish that’s as stunning to look at as it is delicious to devour: the Seven Layer Taco Salad! This isn’t just any salad; it’s a vibrant, towering masterpiece packed with all the zesty, savory, and creamy flavors you love in a taco, but artfully arranged for maximum impact. Imagine a clear glass bowl showcasing distinct layers of crunchy chips, crisp lettuce, seasoned ground beef, fresh tomatoes, creamy dressings, and sharp cheddar – each spoonful a perfect medley of textures and tastes. It’s a guaranteed showstopper that brings a festive flair to any gathering, whether it’s a casual weeknight dinner or a lively potluck.
The beauty of a layered taco salad lies in its brilliant simplicity and incredible versatility. While the concept of a taco salad has been a beloved staple for decades, offering a deconstructed, fork-friendly version of the classic taco, the “seven-layer” approach takes it to a whole new level of visual appeal and flavor harmony. This particular recipe is designed to be effortlessly crowd-pleasing, easy to prepare (with many components that can be made ahead), and endlessly customizable to suit any palate or dietary preference. We’ll guide you through creating a perfectly balanced salad where every layer plays a crucial role, from the satisfying crunch of the base to the fresh burst of the toppings, ensuring a delightful experience with every bite.
In this comprehensive guide, we’ll break down exactly what makes a seven-layer taco salad so special, offering clear, step-by-step instructions to ensure your creation is both beautiful and incredibly tasty. You’ll learn the secrets to layering for structural integrity and visual appeal, discover pro-tips for preventing sogginess, and explore exciting variations to truly make this recipe your own. Get ready to impress your friends and family with this vibrant, flavorful, and utterly irresistible Seven Layer Taco Salad!
Nutritional Information
Per serving (approximate values):
- Calories: 620
- Protein: 35g
- Carbohydrates: 38g
- Fat: 38g
- Fiber: 6g
- Sodium: 980mg
Ingredients
- 1 lb (450g) lean ground beef
- 1 (1 oz / 28g) packet taco seasoning mix
- 1/2 cup water
- 1 (15 oz / 425g) can refried beans (optional, for an extra layer of creaminess and stability)
- 1 large head iceberg lettuce, finely shredded (about 8 cups)
- 3 medium Roma tomatoes, diced (about 1.5 cups total, divided)
- 1 (16 oz / 450g) container sour cream
- 1/2 cup mayonnaise
- 1 (1 oz / 28g) packet ranch seasoning mix (or 2 tbsp homemade ranch seasoning)
- 1/2 teaspoon garlic powder
- 1/4 teaspoon black pepper
- 2 cups (8 oz / 225g) shredded sharp cheddar cheese
- 1 large avocado, diced
- 1 (13 oz / 370g) bag tortilla chips, lightly crushed
- 1/4 cup fresh cilantro, chopped, for garnish
- Optional: 1 (15 oz / 425g) can black beans, rinsed and drained
- Optional: 1 (15 oz / 425g) can corn, drained
- Optional: Sliced black olives
- Optional: Sliced green onions
Instructions
- Prepare the Ground Beef: In a large skillet, cook the ground beef over medium-high heat, breaking it up with a spoon, until fully browned. Drain any excess grease thoroughly. Stir in the taco seasoning mix and 1/2 cup water. Bring to a simmer and cook for 5-7 minutes, or until the liquid has mostly evaporated and the beef is well seasoned. Remove from heat and let cool slightly.
- Prepare the Creamy Dressing: In a medium bowl, combine the sour cream, mayonnaise, ranch seasoning mix, garlic powder, and black pepper. Whisk until smooth and well combined. Taste and adjust seasoning if necessary. This will be your creamy, tangy dressing layer.
- Prepare the Refried Bean Layer (Optional): If using, gently warm the refried beans in a small saucepan over low heat or in the microwave until spreadable. This helps create a smoother, more even layer.
- Prepare Fresh Ingredients: Finely shred the iceberg lettuce. Dice the Roma tomatoes (divide them into two portions: one for a middle layer and one for the top). Dice the avocado just before assembling to prevent browning. Chop the fresh cilantro for garnish.
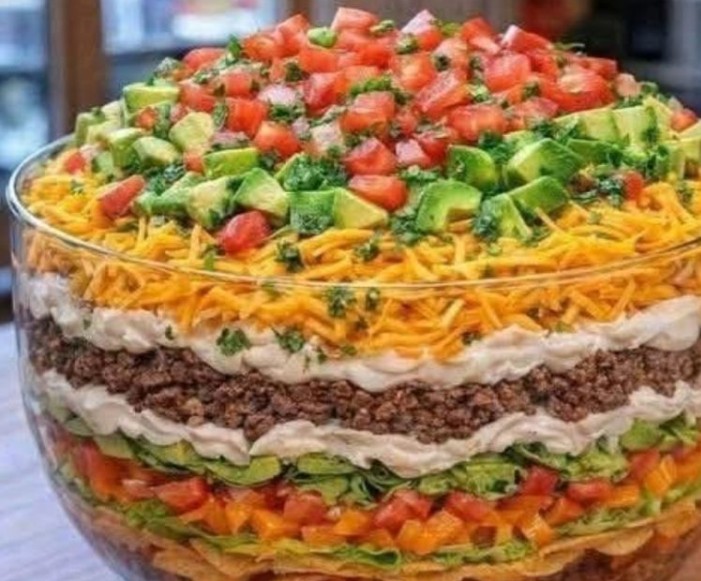
- Begin Assembly (Important: Use a large, clear glass trifle bowl or a deep serving dish to showcase the layers):
- Layer 1: Tortilla Chips: Spread about half of the lightly crushed tortilla chips evenly at the bottom of the clear serving bowl. This forms a crucial crunchy base.
- Layer 2: Shredded Lettuce: Next, add a generous layer of about half of the shredded iceberg lettuce over the chips.
- Layer 3: Refried Beans (Optional): If using, carefully spread the warmed refried beans over the lettuce layer. This adds another creamy texture and helps stabilize the subsequent layers.
- Layer 4: Seasoned Ground Beef: Spoon the cooled seasoned ground beef evenly over the lettuce (or refried beans if using).
- Layer 5: First Creamy Dressing Layer: Gently spread about half of the prepared sour cream dressing mixture over the ground beef.
- Layer 6: Diced Tomatoes: Sprinkle about half of the diced Roma tomatoes over the creamy dressing.
- Layer 7: Shredded Cheese: Add about half of the shredded cheddar cheese evenly over the tomatoes.
- Repeat Layers (Optional, for a taller salad): If your bowl is deep enough and you have remaining ingredients, you can repeat the layers starting from the remaining chips or lettuce, followed by beef, dressing, tomatoes, and cheese.
- Final Layers: Finish with the remaining shredded lettuce, then the remaining creamy dressing, and finally the remaining shredded cheddar cheese.
- Top with Freshness: Arrange the diced avocado and the remaining diced Roma tomatoes on top of the cheese layer.
- Garnish: Sprinkle generously with fresh chopped cilantro.
- Chill and Serve: Cover the salad loosely with plastic wrap and refrigerate for at least 1-2 hours to allow the flavors to meld and the salad to chill thoroughly. This also slightly softens the chips at the bottom, making them easier to scoop while still retaining some crunch.
- Serve: When ready to serve, place a large serving spoon deep into the bowl to ensure each scoop gets all seven delicious layers. Serve immediately with extra tortilla chips on the side for dipping, if desired.
Cooking Tips and Variations
To ensure your Seven Layer Taco Salad is nothing short of spectacular, here are some tips and ideas for customization:
- Preventing Sogginess is Key: The order of layers is crucial for minimizing sogginess. Placing the chips at the very bottom allows them to slightly soften for easier scooping without becoming completely mushy, especially if serving within a few hours. For make-ahead purposes (more than 4-6 hours), consider serving the chips on the side and let guests add them to their individual servings. Another trick is to create a barrier layer, like refried beans or even a thin layer of cream cheese spread, directly over the chips before adding wetter ingredients like lettuce or tomatoes.
- Drain the Beef Thoroughly: After browning the ground beef, make sure to drain ALL of the excess grease. This prevents a greasy salad and keeps the flavors clean and fresh.
- Season Everything: Don’t just rely on the taco seasoning for the beef. Consider adding a pinch of salt and pepper to your shredded lettuce or a dash of lime juice to your diced avocado to brighten flavors. The creamy dressing layer is also a great place to add extra flavor with ranch seasoning, garlic powder, or even a dash of hot sauce for a kick.
- Chill Time for Flavor: While tempting to serve immediately, allowing the salad to chill for at least an hour in the refrigerator helps the flavors meld beautifully. This short chill also slightly softens the bottom chips, making them easier to scoop without losing all their texture.
- Customization is Encouraged: This recipe is incredibly flexible!
- Vegetarian Option: Replace the ground beef with seasoned cooked black beans, pinto beans, or a plant-based ground “meat” substitute.
- Spice It Up: Add a pinch of cayenne pepper or a dash of your favorite hot sauce to the ground beef or the creamy dressing. Include sliced jalapeños (fresh or pickled) as an extra layer.
- Add More Veggies: Incorporate layers of drained canned corn, sliced black olives, finely diced bell peppers (red, yellow, or green), or even finely chopped red onion for extra crunch and flavor.
- Different Cheeses: Experiment with Monterey Jack, Colby Jack, or a Mexican blend cheese instead of or in addition to cheddar.
- Healthier Swaps: Use Greek yogurt instead of sour cream for a tangier, higher-protein dressing. Opt for baked tortilla chips.
- Individual Servings: For parties, consider assembling smaller versions of the salad in individual clear cups or mason jars for a grab-and-go option.
- Even Layers for Visual Appeal: Take a moment to gently spread each layer to the edges of the bowl. This not only makes for a more beautiful presentation but also ensures that every scoop contains a balanced mix of ingredients.
- Avocado at the Last Minute: To prevent avocado from browning, dice it just before the final assembly or toss it with a squeeze of lime juice if preparing slightly in advance.
Storage and Reheating
Proper storage is essential to enjoy your Seven Layer Taco Salad beyond the initial serving, though it’s always best when fresh.
- Storage: Leftover taco salad should be covered tightly with plastic wrap or transferred to an airtight container and refrigerated immediately. It will keep for 1-2 days.
- Preventing Sogginess for Leftovers: The biggest challenge with storing taco salad is preventing the chips and lettuce from becoming soggy. If you anticipate having leftovers, it’s a good strategy to keep the tortilla chips and the very top layer of fresh ingredients (like avocado and top tomatoes) separate and add them only to individual servings. If the salad is already assembled, the chips at the bottom will soften significantly over time.
- Reheating: Taco salad is not suitable for reheating as many of its components are fresh and cold. It is best enjoyed chilled. If you have leftovers, simply scoop out a portion and enjoy it cold. The texture of the chips will be softer, but the flavors will still be delicious.
- Make-Ahead Components: To make meal prep easier, you can prepare several components in advance:
- Cook and season the ground beef, then cool and store it in an airtight container in the refrigerator for up to 3-4 days.
- Prepare the creamy dressing up to 3 days in advance and store it in an airtight container in the refrigerator.
- Shred the lettuce and dice tomatoes (store separately to prevent tomatoes from making lettuce soggy) up to 1 day in advance.
- Dice avocado just before assembly.
Frequently Asked Questions
Can I make this taco salad vegetarian or vegan?
Absolutely! To make it vegetarian, simply omit the ground beef and replace it with seasoned black beans, pinto beans, or a plant-based ground “meat” substitute. For a vegan version, in addition to the beef, swap the sour cream and mayonnaise for a dairy-free sour cream alternative and vegan mayonnaise, and use a plant-based shredded cheese. Ensure your ranch seasoning mix is also vegan-friendly.
What kind of serving dish is best for a seven layer taco salad?
A large, clear glass trifle bowl, a deep glass punch bowl, or a clear glass serving dish with high sides is ideal. The transparency of the bowl allows all the beautiful layers to be visible, which is a big part of the appeal of a seven-layer salad. The deep sides also help contain all the ingredients and make scooping easier.
How far in advance can I assemble the salad?
For the best texture and freshness, especially of the chips and lettuce, it’s best to assemble the full salad no more than 2-3 hours before serving. This allows the flavors to meld and the salad to chill without making the chips completely soggy. If you need to prepare it further in advance, assemble all the layers except for the tortilla chips, avocado, and the very top garnish. Keep these components separate and add them just before serving.